Discuss Scratch

- Discussion Forums
- » Show and Tell
- » ✈️ Flight Simulator 737-800 [DOCUMENTATION]
![[RSS Feed]](//mv-ezproxy-com.ezproxyberklee.flo.org/scratchr2/static/__35b9adb704d6d778f00a893a1b104339__//djangobb_forum/img/feed-icon-small.png "[RSS Feed]")
- awesome-llama
-
 Scratcher

1000+ posts
✈️ Flight Simulator 737-800 [DOCUMENTATION]
This is the documentation for my flight simulator, Flight Simulator / Boeing 737-800 / 2D. It's too big to put in the instructions.
▝▔▔▔▔▔▔▔▔▔▔▔▔▔▔▔▔▔▔▔▔▔▔▔▔▔▔▔▔▔▔▔▔▔▔▔▔▔▔▔▔▔▔▔▔▔▔▔▔▔▔▔▔▔▔▘
⚠ Warning! This is a complicated simulator. It is made to match flying the real 737 as realistically as possible within Scratch. Expect to be confused if you have no prior flying experience. This project may be hard to learn.
⚠ Warning! This is a complicated simulator. It is made to match flying the real 737 as realistically as possible within Scratch. Expect to be confused if you have no prior flying experience. This project may be hard to learn.
CONTENTS
Last edited by awesome-llama (Oct. 21, 2021 21:51:47)
- awesome-llama
-
Scratcher
1000+ posts
✈️ Flight Simulator 737-800 [DOCUMENTATION]
GENERAL INFORMATION
For higher FPS and resolution, try:
https://turbowarp.org/#341589959
When starting the simulator, you will see a configuration screen. Set everything to desired values.
Click [show] in the keybinds section to see all the controls which are similar to previous simulators. They can also be edited here with the edit button.
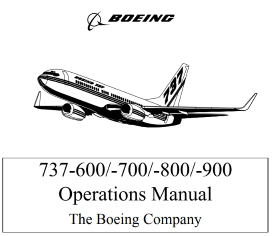
You can refer to the real 737 operations manual, available for download here:
http://toulouse747.com/wp-content/uploads/2018/12/Boeing-B737-700-800-900-Operations-Manual.pdf
Terms that may used in the simulator and this document
IAS - Indicated airspeed (the speed measured by a pitot tube and static port). This is the important one!
GS - Ground speed. The speed you are moving horizontally in relation to the ground below.
TAS - True airspeed. The speed you are moving in relation to the air.
KTS - Knots
FT - Feet
NMI (or NM) - Nautical mile
A/T - Autothrottle
A/P - Autopilot
TO/GA - Take off / go around
V1 - Takeoff decision speed
VR - Rotation speed (pull up)
V2 - Takeoff safety speed
TOCWS - Takeoff configuration warning system
N1 - Engine fan speed. Note that the button “N1” toggles the A/T N1 mode to keep the airplane flying at a constant speed. They aren't the same.
N2 - Engine core speed (compressor)
GPWS - Ground proximity warning system
FD - Flight director
Like real aircraft which must measure speed with real instruments, this simulator uses indicated airspeed. It is vital to know that IAS matters on both the altitude and the speed at which you are travelling, as the instrument measuring it (pitot tube) relies on the pressure of air acting on it. With a faster speed or lower altitude, the pressure is higher, so the IAS reading will be higher.
Having both pressure and airspeed combined actually simplifies everything as the effect of a given speed will always be the same, no matter what the alitude or pressure is. For example, a stall speed of 140 kts IAS is always 140 kts IAS. If the reading is 140 kts at crusing altitude or on final approach, you will stall. Similarly, overspeed is 340 kts IAS. Higher IAS means more pressure acting on the pitot tube and the aircraft, which in real life, is not safe. This simulator doesn't actually have any consequences if you were to overspeed, though.
Remember that the actual speed the airplane is travelling at (ground speed or true airspeed) is not related. In fact, if you were travelling at 300kts IAS at 30,000ft, you are actually travelling at 445 kts true airspeed. The difference is due to the pressure being lower so the pitot tube reads lower. Additionally, the airplane only has lift equivalent to 300 kts at sea level.
For higher FPS and resolution, try:
https://turbowarp.org/#341589959
▝▔▔▔▔▔▔▔▔▔▔▔▔▔▔▔▔▔▔▔▔▔▔▔▔▔▔▔▔▔▔▔▔▔▔▔▔▔▔▔▔▔▔▔▔▔▔▔▔▔▔▔▔▔▔▘
When starting the simulator, you will see a configuration screen. Set everything to desired values.
Click [show] in the keybinds section to see all the controls which are similar to previous simulators. They can also be edited here with the edit button.
▝▔▔▔▔▔▔▔▔▔▔▔▔▔▔▔▔▔▔▔▔▔▔▔▔▔▔▔▔▔▔▔▔▔▔▔▔▔▔▔▔▔▔▔▔▔▔▔▔▔▔▔▔▔▔▘
You can refer to the real 737 operations manual, available for download here:
http://toulouse747.com/wp-content/uploads/2018/12/Boeing-B737-700-800-900-Operations-Manual.pdf
▝▔▔▔▔▔▔▔▔▔▔▔▔▔▔▔▔▔▔▔▔▔▔▔▔▔▔▔▔▔▔▔▔▔▔▔▔▔▔▔▔▔▔▔▔▔▔▔▔▔▔▔▔▔▔▘
Terms that may used in the simulator and this document
IAS - Indicated airspeed (the speed measured by a pitot tube and static port). This is the important one!
GS - Ground speed. The speed you are moving horizontally in relation to the ground below.
TAS - True airspeed. The speed you are moving in relation to the air.
KTS - Knots
FT - Feet
NMI (or NM) - Nautical mile
A/T - Autothrottle
A/P - Autopilot
TO/GA - Take off / go around
V1 - Takeoff decision speed
VR - Rotation speed (pull up)
V2 - Takeoff safety speed
TOCWS - Takeoff configuration warning system
N1 - Engine fan speed. Note that the button “N1” toggles the A/T N1 mode to keep the airplane flying at a constant speed. They aren't the same.
N2 - Engine core speed (compressor)
GPWS - Ground proximity warning system
FD - Flight director
▝▔▔▔▔▔▔▔▔▔▔▔▔▔▔▔▔▔▔▔▔▔▔▔▔▔▔▔▔▔▔▔▔▔▔▔▔▔▔▔▔▔▔▔▔▔▔▔▔▔▔▔▔▔▔▘
Like real aircraft which must measure speed with real instruments, this simulator uses indicated airspeed. It is vital to know that IAS matters on both the altitude and the speed at which you are travelling, as the instrument measuring it (pitot tube) relies on the pressure of air acting on it. With a faster speed or lower altitude, the pressure is higher, so the IAS reading will be higher.
Having both pressure and airspeed combined actually simplifies everything as the effect of a given speed will always be the same, no matter what the alitude or pressure is. For example, a stall speed of 140 kts IAS is always 140 kts IAS. If the reading is 140 kts at crusing altitude or on final approach, you will stall. Similarly, overspeed is 340 kts IAS. Higher IAS means more pressure acting on the pitot tube and the aircraft, which in real life, is not safe. This simulator doesn't actually have any consequences if you were to overspeed, though.
Remember that the actual speed the airplane is travelling at (ground speed or true airspeed) is not related. In fact, if you were travelling at 300kts IAS at 30,000ft, you are actually travelling at 445 kts true airspeed. The difference is due to the pressure being lower so the pitot tube reads lower. Additionally, the airplane only has lift equivalent to 300 kts at sea level.
Last edited by awesome-llama (Jan. 20, 2023 08:38:28)
- awesome-llama
-
Scratcher
1000+ posts
✈️ Flight Simulator 737-800 [DOCUMENTATION]
CONTROLS
By default, the simulator comes with most of the standard controls in the previous ones. Some changes have been made, so it is recommended to read over these again so that critical moments in flight are not missed trying to remember a button.
The simulator also comes with customisation functionality, where in the start menu, the keybinds can be changed. There is an X-Plane option as well. See interface for how to do this.
General:
Other useful keys:
Some keys here have an equivalent on-screen button.
This simulator is not mobile-friendly. It is not a mobile game and was never intended to be.
Most phones wouldn't even be able to run it fast enough anyway. Many lower-end desktop computers wouldn't either.
By default, the simulator comes with most of the standard controls in the previous ones. Some changes have been made, so it is recommended to read over these again so that critical moments in flight are not missed trying to remember a button.
The simulator also comes with customisation functionality, where in the start menu, the keybinds can be changed. There is an X-Plane option as well. See interface for how to do this.
General:
[W], [S] - Increase/decrease thrust
[←], [→] - Elevators
[Q], [A] - Increase/decrease flaps by 1 notch
[E], [D] - Increase/decrease spoilers (multiple modes)
[G] - Toggle landing gear
[B] - Increase wheel brakes
Other useful keys:
[P] - Pause
['] - Play one frame
[-] - Zoom out
[=] - Zoom in
[/] - Toggle mouse controlled yoke (pitch)
[[] - Set zoom to 10%
[]] - Set zoom to 60%
[\] - Toggle audible alarms (e.g. GPWS)
[.] - Toggle elevator automatic reset
[R], [F] - Increase/decrease elevator trim
[T] - Toggle TO/GA
[M] - Toggle audio
[I] - Toggle extra buttons panel
[4]-[7] - Switch between FMC displays
[Click and drag vertically on IAS dial] - Change A/T IAS target
Some keys here have an equivalent on-screen button.
This simulator is not mobile-friendly. It is not a mobile game and was never intended to be.
Most phones wouldn't even be able to run it fast enough anyway. Many lower-end desktop computers wouldn't either.
Last edited by awesome-llama (Sept. 15, 2020 07:26:08)
- awesome-llama
-
Scratcher
1000+ posts
✈️ Flight Simulator 737-800 [DOCUMENTATION]
INTERFACE
This section outlines the functionality of all the on-screen elements of the simulator. It is very detailed and lengthy, so be warned!
Menu screen
When starting the project, the menu screen will always show up. It is triggered by the green flag.
Within the menu, there are a variety of settings provided. There are two pages currently. On the (default) general page, you can set the weather, time, passengers, cargo, fuel, and the flight route. Clicking on buttons will cycle through their options. There are also sliders that can be clicked and dragged.
The flight route switches between all different possible routes, as well as a random generation.
The random generation is no real terrain. It is very basic and was used before the actual routes were created (during testing). All the other routes provide a start and a destination. Some runways can be found in between. It is up to you if you want to land there.
The routes are definite and airports cannot be chosen freely. For example, there is a route between KSFO and KORD and a route between KRDU and KBOS. You couldn't fly from KSFO to KRDU because this is not a choice.
See Adding more routes for more information.
On the settings page, extra features are provided but are not necessary for a beginning user who just wants to fly as soon as possible, which is why they are separated. Here, various buttons allow for setting the keybinds for most of the simulator functions. The top button cycles through the two configured modes, default and X-Plane (a suggestion by some for previous simulators). Clicking the show button shows the list of all the editable keybinds. Note that not all can be customised here. The import/export buttons do exactly what they say. You can import and export keybind save codes if you wanted to retain a version of customised keybinds. Here is an example code from the default keybinds:
You may notice it is just a string of all the keys used in order, from the keybinds list.
In the middle of the settings page are the audio settings. The global volume slider controls all volume, and is like controlling a volume slider on your computer. Here is also a toggle for enabled/disabled alarms. The simulator has a lot of alarms and audible notifications including GPWS callouts and warnings such as “pull up”. This setting controls all sounds except for button presses and environmental sounds such as rain or the aircraft engines. Use the audio test button to get an idea of how loud the simulator will be.
To the right are miscellaneous settings. Set the graphics quality here between high, medium, and low. It is highly recommended to play in high quality, but lower qualities are provided if you really cannot run it fast enough. The graphics quality alters things such as terrain resolution and particle amounts. Keep in mind that the 200+ clones used for all the buttons and text cannot be reduced which may still cause low frame rates.
Below this is the save settings button. It is a very useful feature of this simulator. All the previous settings mentioned will reset if the green flag is pressed (the only way to restart the flight). By clicking it and toggling the button to say “Saved!”, all the features will not reset if the green flag is pressed. This means the flight will straight away be ready for the same configurations. Note that this is disabled by default to prevent beginners from accidentally setting things wrong and not knowing why things aren't working. Also note that this will revert back to default after refreshing the page.
Finally, on all pages is the start button. Press this to start the flight and leave the menu. The menu cannot be viewed again once it is closed, however some actions can be made whilst playing (extra buttons panel).
Alternatively to clicking, the [space] key is available as a shortcut because I have started it up hundreds and hundreds of times and I want to speed up the process.
Instrument panels
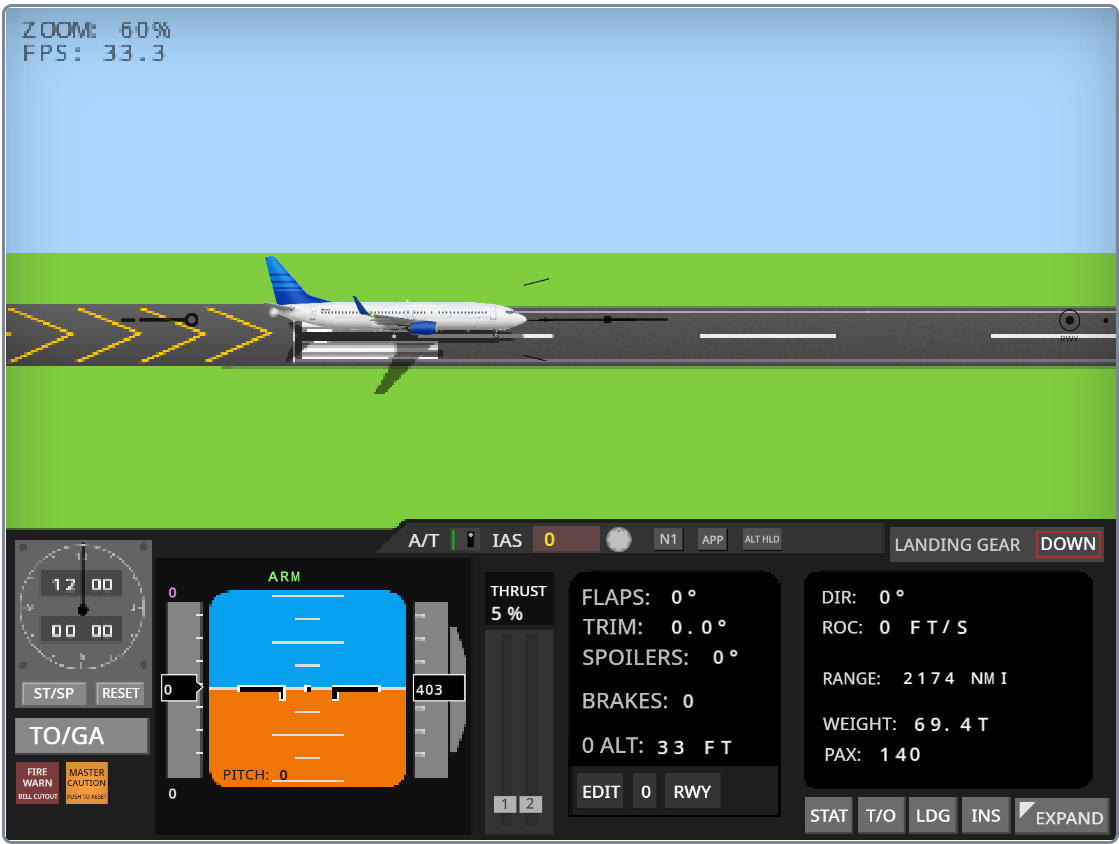
At all times, the main instrument panel is showing at the bottom third of the screen. It shows all the necessary details and flight could theoretically be done by viewing it only. (IFR is somewhat supported).
Extra buttons
A list of extra buttons provide more functions to the simulator. Some are not visible until the airplane is in a suitable state to use the functions (e.g. refuel).
Outline of button functions:
On-screen overlays
Surrounding the aircraft on screen are many useful markers that aid in many aspects of flight. Starting at the left, a line indicates the direction of the elevator as it moves. A small line next to it shows the position of 0.
To the front are multiple lines that rotate around the airplane. One line shows the current pitch, and the line with a square on one end shows the current direction of travel. This is important to know as level flight is achieved when this line is horizontal. Further to the right is a chevron-like marker. This is a more precise indication of the direction of travel. One line shows where level flight is, and the lower line shows the correct approach angle of 2 degrees (named glideslope). During landing, use the chevron to see how steep the approach is. When over the runway and starting to flare, the marker should go green to indicate a safe and comfortable landing. Ensure that the touchdown occurs when the marker is green (where the airplane is almost flying horizontally).
To the right edge of the screen, a circled dot shows which direction the next runway is. Use this to aid in reaching the runway at the right place, and not to miss it by either being too early or too late.
The top-left part of the screen shows the current camera zoom, a value which goes between 5% to 100%. Also there is the current FPS as measured by the timer block. The FPS is calculated by the amount of time it takes to complete one game tick.
Below these two lines of information is where notifications are displayed showing many important details. They provide visual indication to buttons pressed, and also help for users who have limited hearing abilities (warning sounds for example can be displayed).
ETA on the LDG page
On the landing page of the FMC, three coloured values can be seen.

Each number indicates what can be considered the estimated time of arrival (to the next runway) based on certain inputs. SPD is how many seconds before landing speed is achieved (based on acceleration), ALT is how many seconds before reaching the runway's altitude (based on vertical speed), and DIST is how many seconds before the airplane flies over the runway (based on X velocity). A successful landing will always involve all three values being the same - you obviously want to reach the runway at the same time you reach the correct landing speed or altitude. To make this easier to read, the values are coloured from green to red, with green being optimal (all values are similar so the inputs will match up when you land), and red meaning that something is not right.
Mathematically, the colour is based on the difference a value is from the average of all three. Green is when the value is the closest to the average.
This section outlines the functionality of all the on-screen elements of the simulator. It is very detailed and lengthy, so be warned!
Menu screen
When starting the project, the menu screen will always show up. It is triggered by the green flag.
Within the menu, there are a variety of settings provided. There are two pages currently. On the (default) general page, you can set the weather, time, passengers, cargo, fuel, and the flight route. Clicking on buttons will cycle through their options. There are also sliders that can be clicked and dragged.
The flight route switches between all different possible routes, as well as a random generation.
The random generation is no real terrain. It is very basic and was used before the actual routes were created (during testing). All the other routes provide a start and a destination. Some runways can be found in between. It is up to you if you want to land there.
The routes are definite and airports cannot be chosen freely. For example, there is a route between KSFO and KORD and a route between KRDU and KBOS. You couldn't fly from KSFO to KRDU because this is not a choice.
See Adding more routes for more information.
On the settings page, extra features are provided but are not necessary for a beginning user who just wants to fly as soon as possible, which is why they are separated. Here, various buttons allow for setting the keybinds for most of the simulator functions. The top button cycles through the two configured modes, default and X-Plane (a suggestion by some for previous simulators). Clicking the show button shows the list of all the editable keybinds. Note that not all can be customised here. The import/export buttons do exactly what they say. You can import and export keybind save codes if you wanted to retain a version of customised keybinds. Here is an example code from the default keybinds:
w/s/left arrow/right arrow/q/a/e/d/b/-/=/g///\/./r/f/[/]/m/t/i/4/5/6/7/
In the middle of the settings page are the audio settings. The global volume slider controls all volume, and is like controlling a volume slider on your computer. Here is also a toggle for enabled/disabled alarms. The simulator has a lot of alarms and audible notifications including GPWS callouts and warnings such as “pull up”. This setting controls all sounds except for button presses and environmental sounds such as rain or the aircraft engines. Use the audio test button to get an idea of how loud the simulator will be.
To the right are miscellaneous settings. Set the graphics quality here between high, medium, and low. It is highly recommended to play in high quality, but lower qualities are provided if you really cannot run it fast enough. The graphics quality alters things such as terrain resolution and particle amounts. Keep in mind that the 200+ clones used for all the buttons and text cannot be reduced which may still cause low frame rates.
Below this is the save settings button. It is a very useful feature of this simulator. All the previous settings mentioned will reset if the green flag is pressed (the only way to restart the flight). By clicking it and toggling the button to say “Saved!”, all the features will not reset if the green flag is pressed. This means the flight will straight away be ready for the same configurations. Note that this is disabled by default to prevent beginners from accidentally setting things wrong and not knowing why things aren't working. Also note that this will revert back to default after refreshing the page.
Finally, on all pages is the start button. Press this to start the flight and leave the menu. The menu cannot be viewed again once it is closed, however some actions can be made whilst playing (extra buttons panel).
Alternatively to clicking, the [space] key is available as a shortcut because I have started it up hundreds and hundreds of times and I want to speed up the process.
▝▔▔▔▔▔▔▔▔▔▔▔▔▔▔▔▔▔▔▔▔▔▔▔▔▔▔▔▔▔▔▔▔▔▔▔▔▔▔▔▔▔▔▔▔▔▔▔▔▔▔▔▔▔▔▘
Instrument panels
At all times, the main instrument panel is showing at the bottom third of the screen. It shows all the necessary details and flight could theoretically be done by viewing it only. (IFR is somewhat supported).
- To the left is a chronometer (clock). It shows the current world time at the top, and below is a stop-watch for personal use. This can be used to time flights, and serves no purpose directly to controlling the aircraft. Click the start/stop or reset buttons with the mouse. No keys are defined.
- Below the chronometer is a TO/GA button, which can also be triggered with [T]. Refer to section How to fly, land, and more for details on how it functions. A green dot shows it is enabled.
- At the bottom-left are two square buttons, FIRE WARN and MASTER CAUTION. If the buttons illuminate, something is wrong. You can disable alarms by clicking them so the light goes out. FIRE WARN notifies of fire, and a bell will sound until this button is pressed. MASTER CAUTION is for other issues such as low fuel.
- To the right is the primary flight display (PFD) including an orange and blue display. It is important to watch. The middle shows the artificial horizon/attitude indicator and moves based on the aircraft's pitch as if this was looking forwards. Horizontal white lines indicate increments of 10 degrees. Pitch as a value is also displayed.
To the left is a speed tape, and in the middle, the current speed is shown (indicated airspeed in knots). A red dotted line shows for speeds that are higher than what is allowed (“overspeed”), and will cause constant warning (ticking sound) if reached.
On the opposite side, the current altitude is shown. This is set to 0 at sea level, but remember that terrain can move up and down independent to what is detected here.
At the top, green text indicates the autothrottle setting, default to ARM. Refer to section How to fly, land, and more for details on how it functions.
The magenta text at the top of the speed tape shows the current IAS target, the same as the yellow text in the top-middle of the interface.
At the bottom of the speed tape is the current ground speed, or if fast enough, the current mach number (showing with a decimal point). Mach 1 is the speed of sound in the local fluid (changes slightly with temperature).
Below the attitude indicator will show any warnings such as “overspeed” if such warnings are activated. It will not show for any other time. - In the middle of the screen, a basic throttle quadrant is shown. Idle is 5% thrust. This simulator is deliberately limited to only be a simple control. Engines cannot be individually controlled here.
- At the top-middle, above the throttle quadrant are the settings for the autothrottle. The left switch enables or disables the autothrottle. The dial to the right of the yellow/red panel can be clicked and dragged to change the value displayed. Click the dial, then drag up or down to increase or decrease the value. The up and down arrow keys can be used as well whilst the button is being dragged (in case the scroll wheel works).
- To the right of the throttle quadrant is a black screen that shows important airplane details. This is not like the real 737 and is a simplified summary of many different instruments. Below these are three buttons: EDIT, 0, and RWY. They control the “0 ALT” value which is essentially a way to calibrate the altimeter.
- To the far right, another panel shows a simplified summary of other details, taking most of the important parts of the flight management computer (FMC). There are four pages which can be viewed with the buttons below or with the 4-7 number keys.
- At the bottom right is a toggle button to show or hide additional buttons on the screen. This can be toggled with the [i] key. See below with more details on the functionality of those buttons.
- Finally, shown at the right is the current state of the landing gear. It will show with two dashes (- -) if the landing gear is being moved or it is broken.
Extra buttons
A list of extra buttons provide more functions to the simulator. Some are not visible until the airplane is in a suitable state to use the functions (e.g. refuel).
Outline of button functions:
- Repair - Appears if stopped on the ground. Repairs everything so that the airplane is ready to fly again.
- Refuel - Appears if stopped on the ground. Once clicked, type in how much fuel the airplane should have. Capacity: 18,000kg.
- Shut down / Start - Allows for engines to be individually started or stopped. The thrust percentage readout will go red if either engine is stopped. A thrust displayed as 80% would actually be only 40% with one engine running.
- Extinguish fire - (WIP) An engine fire can be extinguised with this button.
- Skip time (5 min / 10 min / 1hr) - Skips this amount of time. To use, the airplane must be in a stable and suitable position.
- Go around - retry landing - Because the simulator is 2D, travel is only along one plane. Clicking this button makes an imaginary circuit around the airport and the airplane is placed at the start of the approach again. Click this to retry a missed landing.
- Taxi to takeoff postion - Teleports the airplane to the start of the runway it is currently on. Allows for taking off again after landing.
▝▔▔▔▔▔▔▔▔▔▔▔▔▔▔▔▔▔▔▔▔▔▔▔▔▔▔▔▔▔▔▔▔▔▔▔▔▔▔▔▔▔▔▔▔▔▔▔▔▔▔▔▔▔▔▘
On-screen overlays
Surrounding the aircraft on screen are many useful markers that aid in many aspects of flight. Starting at the left, a line indicates the direction of the elevator as it moves. A small line next to it shows the position of 0.
To the front are multiple lines that rotate around the airplane. One line shows the current pitch, and the line with a square on one end shows the current direction of travel. This is important to know as level flight is achieved when this line is horizontal. Further to the right is a chevron-like marker. This is a more precise indication of the direction of travel. One line shows where level flight is, and the lower line shows the correct approach angle of 2 degrees (named glideslope). During landing, use the chevron to see how steep the approach is. When over the runway and starting to flare, the marker should go green to indicate a safe and comfortable landing. Ensure that the touchdown occurs when the marker is green (where the airplane is almost flying horizontally).
To the right edge of the screen, a circled dot shows which direction the next runway is. Use this to aid in reaching the runway at the right place, and not to miss it by either being too early or too late.
The top-left part of the screen shows the current camera zoom, a value which goes between 5% to 100%. Also there is the current FPS as measured by the timer block. The FPS is calculated by the amount of time it takes to complete one game tick.
Below these two lines of information is where notifications are displayed showing many important details. They provide visual indication to buttons pressed, and also help for users who have limited hearing abilities (warning sounds for example can be displayed).
ETA on the LDG page
On the landing page of the FMC, three coloured values can be seen.
Each number indicates what can be considered the estimated time of arrival (to the next runway) based on certain inputs. SPD is how many seconds before landing speed is achieved (based on acceleration), ALT is how many seconds before reaching the runway's altitude (based on vertical speed), and DIST is how many seconds before the airplane flies over the runway (based on X velocity). A successful landing will always involve all three values being the same - you obviously want to reach the runway at the same time you reach the correct landing speed or altitude. To make this easier to read, the values are coloured from green to red, with green being optimal (all values are similar so the inputs will match up when you land), and red meaning that something is not right.
Mathematically, the colour is based on the difference a value is from the average of all three. Green is when the value is the closest to the average.
Last edited by awesome-llama (April 13, 2021 16:18:34)
- awesome-llama
-
Scratcher
1000+ posts
✈️ Flight Simulator 737-800 [DOCUMENTATION]
HOW TO FLY AND LAND, + MORE
How to fly
1. Check that the flaps are set to the right position (depends on weight and other factors). Also see the flight management computer (FMC) for take off information and v-speeds. Use its calculate button to automatically find these speeds.
2. Ensure that brakes are not set. Ensure that autothrottle (A/T) is set to ARM (by default it is, click the green switch to toggle it for OFF/ARM)
3. Increase thrust to about 40% to stabilise engines, and once there, enable TO/GA for A/T. Alternatively, you can take off with manual thrust. Default: 89%
4. Accelerate to rotation speed (VR) and rotate off the runway.
5. Retract landing gear once you are high enough.
Cruising
Once at a suitable level for level flight (around 35,000 ft), the airplane can be pitched down and made to fly level and at a constant speed.
The autothrottle can be configured to keep the airplane at a constant speed by automatically setting the thrust. Set the IAS value to the target speed (click and drag the dial), and once set, press N1. That's it. The airplane should keep the same speed. Note that having a change in altitude or use of other controls may cause the autothrottle to be unable to keep the same speed.
This simulator uses real world terrain. Flights will take as long as they would normally. Fortunately, time can be skipped. To do so, ensure that the climb rate is approximately 0, and there is little acceleration occurring (reduce or increase thrust until speed does not change). Open up the extra buttons menu, and three buttons should be visible to skip time 5 minutes, 20 minutes, or 1 hour.
How to land
1. Prepare for descent by ensuring that the altimeter has been calibrated to the runway's altitude. See below (Altimeter) for an explanation.
2. Reduce thrust to idle and glide down towards the runway. Use the circle marker on the screen as a guide for where the runway is and align the trajectory marker (line with square dot) towards it. Zoom out the screen to see.
3. When approaching the runway, select the correct flap setting, and soon after, extend the landing gear. Watch your speed. You want to slow down to landing speed, but not stall. Use spoilers to slow down. The spoilers should then be set to Arm to automatically deploy when landing.
4. Look at the PFD for the magenta FD marking, which also indicates the pitch for reaching the runway (white lines are 5 degrees apart).
5. As you fly over the runway threshold, let the aircraft glide down and flare it (pull up) to get a smooth landing rather than falling onto the ground. Be careful. It is really easy to hit the ground hard. Look at the little marker on screen which shows an accurate rate of climb. Make it green as you touch the runway.
6. Begin braking, and allow the airplane to slow down.
7. Once stopped, the extra buttons panel shows extra functions including repairs, refuel, and taxi to takeoff position so you can fly again.
A video can be watched here: https://youtu.be/TRG4VA_EwHs
Operating the autothrottle
Note that the functionality in this simulator is designed to match the real autothrottle closely, however many features and specific details have not been included for simplicity and a lack of readable guides to all the intricacies of how it works.
Firstly is the autothrottle switch. Marked A/T, it is the master control for the autothrottle. Turning it off will stop the autothrottle and turn it off. Turning it back on will set it to ARM mode, the default where it is waiting for input. Toggling this switch whilst perfoming a function will stop the function completely, and will not resume it once back on.
The autothrottle has many modes. The modes allow for different functions.
When enabling TO/GA for a takeoff, the autothrottle will switch to N1. This moves the throttle to takeoff thrust, default is 89%. Once there and IAS increases past 80, the A/T will switch to THR HOLD (throttle hold), indicating that it is no longer doing anything. Once past an altitude of 500ft, the A/T will finally switch back to ARM where it is ready for input to begin other functions.
Whilst in flight, N1 mode can be set by clicking the N1 button to the right of the A/T switch. This causes the autothrottle to automatically control the thrust to keep the airplane moving at a specified speed. This is the speed set by the IAS dial.
TOCWS
Takeoff configuration warning system
Many accidents have occurred in the past involving an airplane that was not properly configured for takeoff. For example, a flaps-up takeoff is dangerous because less lift is produced and the airplane will require a faster speed (and longer runway) to get in the air. TOCWS is incorporated into Boeing 737s that indicate when you are not ready to fly, and is triggered by increasing the throttle. An alarm will start and will not stop until the configuration is fixed, or you ignore the alarm and continue to take off.
Check that your flaps are in the correct position, spoilers are not extended, and you don't have your brakes set.
Altimeter
The altimeter fitted in many airplanes work off air pressure. Because of this, the measurement is not going to reflect your terrain height, but instead, your height above sea level.
In this simulator, you will need to ensure you have set the altitude where 0 ft is read from. Note that this is a simplification of what is done in real life, and does not fully reflect it.
Use the buttons to the right of the throttle quadrant to do so. Usually, you will want to set it as the altitude of the runway. The ALT button will do it for you. There are also buttons to set it to 0 ft, or put in a custom number.
Last edited by awesome-llama (Oct. 21, 2021 21:51:22)
- awesome-llama
-
Scratcher
1000+ posts
✈️ Flight Simulator 737-800 [DOCUMENTATION]
Reporting Glitches
If a glitch is found, you may comment it here. It is recommended that you provide lots of details relevant.
Stop!
Make sure it actually is a glitch that I can fix.
Do not tell me about:
Hold [space], and tap [/] to get a flight log of the simulator at its current state. Copy the code and include it with the comment. Here is an example:
The code above provides many useful details and is compressed to fit into a comment and also not trigger the phone number censor.
Figure it out if you want, but it is nothing cryptic and special. It just says the variable name shortened, then the rounded value of it. Alt = altitude for example. Note that all values are in metric because the simulator internally does calculations in metric (it's so much simpler).
If a glitch is found, you may comment it here. It is recommended that you provide lots of details relevant.
Stop!
Make sure it actually is a glitch that I can fix.
Do not tell me about:
- Parts of the world not rendering AND you are on ChromeBook or some sort of Apple device. (Issue with Scratch itself)
- The airplane physics glitching AND you are on a really slow computer Drop the rendering quality in the settings to try and prevent this.
- The altimeter showing negative values or not aligning with terrain height. (It's supposed to work like that, not a glitch)
Hold [space], and tap [/] to get a flight log of the simulator at its current state. Copy the code and include it with the comment. Here is an example:
ExportedSimulation_(2020-9-26/7573)_v.1.02_alt:3155_ter.h:1143_spd:151_thr:89/89_pt:-2_fl:5_sp:0_br:0_fuel:14334_wgt(t):69.3_a/t:arm_||_imp.spd:0_wthr:1_fps:16_zm:35%_t(s):43314_clone:230_x.pos(km):209_||_route:ksfo-kord_||_lists_ptlc:0_terr:15048_stmp:40_||_len.exp:271
The code above provides many useful details and is compressed to fit into a comment and also not trigger the phone number censor.
Figure it out if you want, but it is nothing cryptic and special. It just says the variable name shortened, then the rounded value of it. Alt = altitude for example. Note that all values are in metric because the simulator internally does calculations in metric (it's so much simpler).
Last edited by awesome-llama (April 25, 2023 16:56:05)
- awesome-llama
-
Scratcher
1000+ posts
✈️ Flight Simulator 737-800 [DOCUMENTATION]
TECHNICAL DETAILS
If you just want to fly, you do not need to read this section.
It is recommended for remixers or anyone wanting to create a simulator themselves.
General concept
This flight simulator handles 2D vector mathematics and real physics equations to provide a realistic experience. Every frame, the resultant force vector is calculated from thrust, lift, drag, friction, braking, and gravity, through the use of their appropriate formulas. This is then applied to the acceleration with F=ma, and every frame, that updates the x and y velocities, and finally the position of the airplane within the world.
Because of frame rate fluctuations, complex projects are susceptible to rough movements that are based on how fast the project runs. This is taken into consideration and for any motion or physics calculation, the simulator ensures that the amount of movement makes sense for how fast it runs. 10 FPS would mean fewer calculated frames, but every calculation is a larger movement compared to, say, 20 FPS.
It is designed to be easily remixed and customised to make different aircraft. See the lists inside the project to access all the aircraft specifications that are used. Modifying the physics is as easy as setting the correct values. Additionally, the aircraft can be put into hypothetical situations and still function.
This project is nearing the limit of what Scratch can do. It almost hits the clone limit, and many computers would run this pretty slow.
Units
ALL PARTS OF THE SIMULATOR PHYSICS ARE INTERNALLY CALCULATED IN METRIC/SI. Any non-metric values (e.g. ft, nmi) are calculated from metric values instead.
To fit real-world airplanes, the standard display units are used, so nautical miles for distance, feet for altitude, knots for airspeed, etc. Changing it is not supported officially. In the case that a remixer wants to change what is displayed, good luck as you would have to check through every sprite for anything displaying these units (but not calculating physics).
What isn't simulated
Having no formal education in aircraft physics or engineering when I made the sim, some things ended up not being included because I didn't know they existed or didn't know how to reasonably implement them. Honestly I'm amazed I managed to do so well considering that. I had no experience in flying games or simulators, either.
Here's an incomplete list:
Fun fact, now I do have some formal education on this subject. I hold a RePL and cert III in aviation, and I've also taken a university elective class on aviation engineering. I hope to get a PPL in the future.
Command system
Included in the simulator is a useful command tool. It provides access to almost any sort of change you would want to make. Most commands are started by inputting their name, but others require multiple inputs, which will appear in the input box in order.
Also note that the commands do not check for validity. You may accidentally break something, say if you were to cause a divide by 0 error somewhere.
To open the command input box, at any time, hold [space] and tap [0]. If you wanted to set the airplane's fuel to a custom amount, type sf, hit enter and then a new box opens to type in the number. Type it in and the fuel will be set.
Some of the commands:
Adding more routes
The routes are definite and airports cannot be chosen freely. For example, there is a route between KSFO and KORD and a route between KRDU and KBOS. You couldn't fly from KSFO to KRDU because this is not a choice. The reasoning for this is due to data size. To accurately represent the world's terrain, I need data points every 200 metres. The Earth is 40,000 km in circumference (8,000 data points), and for an equirectangular map to handle every airport on the planet, that makes a resolution of 8000px by 4000px. That is huge and Scratch could not run such a thing fast enough. Also, the other possibility is to have every possible combination of routes, which means that for x amount of airports, there will be xC2 connections, or x! / 2(x-2)! connections. Given just 6 airports, that makes 15 different routes to store. With 16 airports? 120. Say each route is 10,000 characters long, and then we have a bit of a problem, plus that it would take weeks to generate them all.
https://www.desmos.com/calculator/npjpm9fezo
How to remix properly
Of course, majority of remixers just want a copy of the simulator for themselves, and think they are quite fine with not changing anything. It is against the rules, however, I don't bother enforcing it due to the huge amount of remixes that happen plus what I get out of it are archived versions of the project.
That said, it is still really cool to see projects remixed properly, with care, creating all sorts of interesting derivatives.
This simulator is designed to be customisible. Many settings are easily accessed and can be changed. If changing the aircraft, it is not too hard to do, as long as it has some similarity to a 737. A 787 is much easier to make with this then say, a Concorde. (787 also has twin turbofan engines, functions in similar ways being Boeing, etc. A concorde flies above mach 1 and supersonic phyiscs aren't calculated here so you have a lot more work to convert, plus the functions would need things like more engines, afterburners, different drag/lift coefficient formulas.)
The simple changes can be done in the first configuration sprite of the project. Look through here and available are a lot of the really vital settings. The configuration list is used a lot, and this is where many aspects of an aircraft are assigned. Also see in the stage is the variables which reset by pressing the green flag.
With more advanced projects, look through the airplane sprite physics script. Blocks are commented to make it easier. For vital parts such as the coefficient calculations, this is the tricky part. You need to find a formula that matches the aircraft chosen. Due to all airplanes being different shapes, these calculations can vary a lot.
>> It is highly recommended to have at least high school level understanding of mathematics and physics. That is, you are currently studying or have graduated with these two classes completed.
With mathematics, you need to know trigonometry, different functions and how to manipulate them, and vectors.
With physics, you need to understand how formulas work in general, and also understand concepts such as force, acceleration, velocity, and displacement (and apply it to 2D space).
Flight route saves
For all flight routes that are not randomly generated, the runways and terrain data must be stored.
Notice: flight route v2 is now in-use. If making new routes, please use it instead.
v2 saves
A flight route is stored as a string. Parts of the data are separated by commas and colons. This is the same format in use by many of my projects.
The structure is like a dictionary, with an attribute name followed by colon, then followed by its data. Some are lists and the project knows this based on the name. Attributes can be any order. The only thing that must be positioned correctly is the magic number, fr_v2, which is at the start.
The format is quite obvious looking at the example above. Orange is the magic number, blue are the keys, magenta and black are the values of those keys. Note that the magenta values are special. Some keys require that the first value, coloured magenta, specify the number of items following. For example, there are 4 runways above so a 4 is the first number after rwys. There are 3600 terrain values so the number 3600 specifies that.
v1 saves
(do not use! partially deprecated!)
This is done through a custom save format, named flight_route.
The structure of the flight_route is as follows:
- First, flight_route identifies the save.
- Separating it is the equals sign with a number that states the total terrain distance in kilometres.
- Next is the runway data, which contains four items, each separated by backslashes. The first item is the runway name (which can contain any characters except backslashes). It is reccommended to stick with lowercase letters and other basic ASCII characters as the runway name is printed out in the interface with pen stamps. Not every character can be stamped, specifically uppercase character data (the lowercase data is rendered as uppercase on screen instead).
- The second item is the runway x postion in metres from the world's origin at x=0. Commonly, the first runway is a few kilometres from the origin to allow for visible terrain before the runway (as seen zoomed out).
- The third item is the runway length, stored in metres. The runway is defined as starting at the x position of the second item, and goes to the right for the distance this third item defines.
- The fourth item is the runway altitude above sea level (normally defined as an altitude of 0). Runways are always perfectly flat in this simulator. If a runway altitude ends up lower or higher than the actual terrain height data at that location, usually, the simulator tries to fix this by moving the terrain to match.
- Between each runway are two backslashes (\\).
- Each runway is defined in order of when it is reached. The last runway is the last set of items.
- After all runways are defined, an exclamation mark (!) indicates the terrain height data start.
- Every terrain height is a rounded number of any length, each separated by a backslash. Each point here is spaced out 200 metres apart, so 5 points of terrain height data is 1 kilometre. The spacing is a choice based on data limitations which is a compromise between quality and storage space/management. Terrain heights can be below 0 for areas underwater.
- At the end of the terrain data is another exclamation mark, followed by a backslash.
- The final part of the save is the terrain type, which can be of grass, water, desert, or snow. A special x type exists as well, which does not mean anything and will be rendered as magenta ground. Each item here consists of 6 characters only. The first is the terrain type, and the 5 numbers following indicate which node the terrain will change. In the example below, it shows that grass starts at the first terrain node (x=0), and goes until it reaches water at the 1096th node (~220 km).
To import/export, run the simulator and open up the command system. Either type import or export. If importing, a second input asks for the data type. PPM is an image file type, and is what enables the importing of terrain heightmaps. Instead, type in “fr” for flight route, and then paste the route data into the third input.
If you just want to fly, you do not need to read this section.
It is recommended for remixers or anyone wanting to create a simulator themselves.
▝▔▔▔▔▔▔▔▔▔▔▔▔▔▔▔▔▔▔▔▔▔▔▔▔▔▔▔▔▔▔▔▔▔▔▔▔▔▔▔▔▔▔▔▔▔▔▔▔▔▔▔▔▔▔▘
General concept
This flight simulator handles 2D vector mathematics and real physics equations to provide a realistic experience. Every frame, the resultant force vector is calculated from thrust, lift, drag, friction, braking, and gravity, through the use of their appropriate formulas. This is then applied to the acceleration with F=ma, and every frame, that updates the x and y velocities, and finally the position of the airplane within the world.
Because of frame rate fluctuations, complex projects are susceptible to rough movements that are based on how fast the project runs. This is taken into consideration and for any motion or physics calculation, the simulator ensures that the amount of movement makes sense for how fast it runs. 10 FPS would mean fewer calculated frames, but every calculation is a larger movement compared to, say, 20 FPS.
It is designed to be easily remixed and customised to make different aircraft. See the lists inside the project to access all the aircraft specifications that are used. Modifying the physics is as easy as setting the correct values. Additionally, the aircraft can be put into hypothetical situations and still function.
This project is nearing the limit of what Scratch can do. It almost hits the clone limit, and many computers would run this pretty slow.
Units
ALL PARTS OF THE SIMULATOR PHYSICS ARE INTERNALLY CALCULATED IN METRIC/SI. Any non-metric values (e.g. ft, nmi) are calculated from metric values instead.
To fit real-world airplanes, the standard display units are used, so nautical miles for distance, feet for altitude, knots for airspeed, etc. Changing it is not supported officially. In the case that a remixer wants to change what is displayed, good luck as you would have to check through every sprite for anything displaying these units (but not calculating physics).
What isn't simulated
Having no formal education in aircraft physics or engineering when I made the sim, some things ended up not being included because I didn't know they existed or didn't know how to reasonably implement them. Honestly I'm amazed I managed to do so well considering that. I had no experience in flying games or simulators, either.
Here's an incomplete list:
- lift-induced drag
- air temperature
- wind
- engine performance variation in different conditions
Fun fact, now I do have some formal education on this subject. I hold a RePL and cert III in aviation, and I've also taken a university elective class on aviation engineering. I hope to get a PPL in the future.
Command system
Included in the simulator is a useful command tool. It provides access to almost any sort of change you would want to make. Most commands are started by inputting their name, but others require multiple inputs, which will appear in the input box in order.
Also note that the commands do not check for validity. You may accidentally break something, say if you were to cause a divide by 0 error somewhere.
To open the command input box, at any time, hold [space] and tap [0]. If you wanted to set the airplane's fuel to a custom amount, type sf, hit enter and then a new box opens to type in the number. Type it in and the fuel will be set.
Some of the commands:
- Set airspeed - ss
- Set height (altitude) - sh
- Set X position - sx
- Set pitch - sp
- Set time - st
- Set fuel - sf
- Set camera zoom - sz
- Repair aircraft - repair
- Set weather - weather
- Set graphics quality - sq
- Get flight statistics (compressed into one line to fit into a comment) - stats
Adding more routes
The routes are definite and airports cannot be chosen freely. For example, there is a route between KSFO and KORD and a route between KRDU and KBOS. You couldn't fly from KSFO to KRDU because this is not a choice. The reasoning for this is due to data size. To accurately represent the world's terrain, I need data points every 200 metres. The Earth is 40,000 km in circumference (8,000 data points), and for an equirectangular map to handle every airport on the planet, that makes a resolution of 8000px by 4000px. That is huge and Scratch could not run such a thing fast enough. Also, the other possibility is to have every possible combination of routes, which means that for x amount of airports, there will be xC2 connections, or x! / 2(x-2)! connections. Given just 6 airports, that makes 15 different routes to store. With 16 airports? 120. Say each route is 10,000 characters long, and then we have a bit of a problem, plus that it would take weeks to generate them all.
https://www.desmos.com/calculator/npjpm9fezo
How to remix properly
Of course, majority of remixers just want a copy of the simulator for themselves, and think they are quite fine with not changing anything. It is against the rules, however, I don't bother enforcing it due to the huge amount of remixes that happen plus what I get out of it are archived versions of the project.
That said, it is still really cool to see projects remixed properly, with care, creating all sorts of interesting derivatives.
This simulator is designed to be customisible. Many settings are easily accessed and can be changed. If changing the aircraft, it is not too hard to do, as long as it has some similarity to a 737. A 787 is much easier to make with this then say, a Concorde. (787 also has twin turbofan engines, functions in similar ways being Boeing, etc. A concorde flies above mach 1 and supersonic phyiscs aren't calculated here so you have a lot more work to convert, plus the functions would need things like more engines, afterburners, different drag/lift coefficient formulas.)
The simple changes can be done in the first configuration sprite of the project. Look through here and available are a lot of the really vital settings. The configuration list is used a lot, and this is where many aspects of an aircraft are assigned. Also see in the stage is the variables which reset by pressing the green flag.
With more advanced projects, look through the airplane sprite physics script. Blocks are commented to make it easier. For vital parts such as the coefficient calculations, this is the tricky part. You need to find a formula that matches the aircraft chosen. Due to all airplanes being different shapes, these calculations can vary a lot.
>> It is highly recommended to have at least high school level understanding of mathematics and physics. That is, you are currently studying or have graduated with these two classes completed.
With mathematics, you need to know trigonometry, different functions and how to manipulate them, and vectors.
With physics, you need to understand how formulas work in general, and also understand concepts such as force, acceleration, velocity, and displacement (and apply it to 2D space).
Flight route saves
For all flight routes that are not randomly generated, the runways and terrain data must be stored.
Notice: flight route v2 is now in-use. If making new routes, please use it instead.
v2 saves
A flight route is stored as a string. Parts of the data are separated by commas and colons. This is the same format in use by many of my projects.
The structure is like a dictionary, with an attribute name followed by colon, then followed by its data. Some are lists and the project knows this based on the name. Attributes can be any order. The only thing that must be positioned correctly is the magic number, fr_v2, which is at the start.
Example data:
(middle part removed to take up less space)
fr_v2,dist(km):3600,rwys:4,ymml,5000,2286,132,,ymay,324000,1900,164,,yscb,549000,3283,575,,yssy,715000,3962,6,,terr_elev:3600,0,153,163,153,[…],terr_type:6,g,3533,w,10,g,4,w,29,g,25,w,1,
The format is quite obvious looking at the example above. Orange is the magic number, blue are the keys, magenta and black are the values of those keys. Note that the magenta values are special. Some keys require that the first value, coloured magenta, specify the number of items following. For example, there are 4 runways above so a 4 is the first number after rwys. There are 3600 terrain values so the number 3600 specifies that.
v1 saves
(do not use! partially deprecated!)
This is done through a custom save format, named flight_route.
The structure of the flight_route is as follows:
- First, flight_route identifies the save.
- Separating it is the equals sign with a number that states the total terrain distance in kilometres.
- Next is the runway data, which contains four items, each separated by backslashes. The first item is the runway name (which can contain any characters except backslashes). It is reccommended to stick with lowercase letters and other basic ASCII characters as the runway name is printed out in the interface with pen stamps. Not every character can be stamped, specifically uppercase character data (the lowercase data is rendered as uppercase on screen instead).
- The second item is the runway x postion in metres from the world's origin at x=0. Commonly, the first runway is a few kilometres from the origin to allow for visible terrain before the runway (as seen zoomed out).
- The third item is the runway length, stored in metres. The runway is defined as starting at the x position of the second item, and goes to the right for the distance this third item defines.
- The fourth item is the runway altitude above sea level (normally defined as an altitude of 0). Runways are always perfectly flat in this simulator. If a runway altitude ends up lower or higher than the actual terrain height data at that location, usually, the simulator tries to fix this by moving the terrain to match.
- Between each runway are two backslashes (\\).
- Each runway is defined in order of when it is reached. The last runway is the last set of items.
- After all runways are defined, an exclamation mark (!) indicates the terrain height data start.
- Every terrain height is a rounded number of any length, each separated by a backslash. Each point here is spaced out 200 metres apart, so 5 points of terrain height data is 1 kilometre. The spacing is a choice based on data limitations which is a compromise between quality and storage space/management. Terrain heights can be below 0 for areas underwater.
- At the end of the terrain data is another exclamation mark, followed by a backslash.
- The final part of the save is the terrain type, which can be of grass, water, desert, or snow. A special x type exists as well, which does not mean anything and will be rendered as magenta ground. Each item here consists of 6 characters only. The first is the terrain type, and the 5 numbers following indicate which node the terrain will change. In the example below, it shows that grass starts at the first terrain node (x=0), and goes until it reaches water at the 1096th node (~220 km).
Example data:Flight routes can be imported and exported from the simulator. This enables editing externally, and the ability to transfer them around (example use - sharing custom made routes).
(middle part removed to take up less space)
flight_route=5100\krdu\10000\3000\133\\kric\230000\2700\51\\kiad\370000\3200\95\\kbos\990000\3400\6\!\115\115\115\115\115\108\108\108\108\108\115\115\115\115\115\108\108\108\108\108\108\108\108\108\108\108\108\108\108\108\94\94\94\94\94\92\92\92\92\92\99\99\99\99\99\99\99\99\99\133\133\133\133\99\99\99\99\99\99\99\99\99\99\99\99\99\99\99\99\99\99\99\99\99\99\99\99\99\99\99\92\92\92\92\92\74\74\74\74\74\66\66\66\66\66\74\74\74\74\74\80\80\80\80\80\88\88\88\88\88\94\94\94\94\94\102\102\102\102\102\102\102\102\102\102\102\102\102\102\102\108\108\108\108\108\115[…]\11\11\11\11!\g00001\w01096\g01111\w01161\g01166\w01251\g01271\w01376\g01411\w01571\g01866\w01896\g01916\w02236\g02241\w02246\g02526\w02586\g02641\w02766\g02816\w02926\g03706\w03881\g04111\w04136\g04146\x05100
To import/export, run the simulator and open up the command system. Either type import or export. If importing, a second input asks for the data type. PPM is an image file type, and is what enables the importing of terrain heightmaps. Instead, type in “fr” for flight route, and then paste the route data into the third input.
Last edited by awesome-llama (May 25, 2023 13:50:25)
- awesome-llama
-
Scratcher
1000+ posts
✈️ Flight Simulator 737-800 [DOCUMENTATION]
CREDITS
Created by awesome-llama.
All scripting by me.
Other resources used in this simulator:
GPWS call-outs - http://www.b737.org.uk/gpws.wav and https://youtu.be/tYeVMOw5v1Q
Warning sounds - https://youtu.be/R-4Q8mhpFLU and https://youtu.be/B2vqmVVZHYE and https://youtu.be/I6MYntKCdik
Engine - https://youtu.be/PAM4Yh0T7ic
Airplane - https://freesound.org/people/awr1001/sounds/468229/
Airplane costume - https://i.imgur.com/4EXQgCi.jpg
Menu images - https://unsplash.com/photos/8iZG31eXkks and https://unsplash.com/photos/9BJRGlqoIUk
Thunder - https://freesound.org/people/straget/sounds/527664 , https://freesound.org/people/juskiddink/sounds/101948 , and https://freesound.org/people/blimp66/sounds/332543
Fire - https://freesound.org/people/Aegersum/sounds/387924
Created by awesome-llama.
All scripting by me.
▝▔▔▔▔▔▔▔▔▔▔▔▔▔▔▔▔▔▔▔▔▔▔▔▔▔▔▔▔▔▔▔▔▔▔▔▔▔▔▔▔▔▔▔▔▔▔▔▔▔▔▔▔▔▔▘
Other resources used in this simulator:
GPWS call-outs - http://www.b737.org.uk/gpws.wav and https://youtu.be/tYeVMOw5v1Q
Warning sounds - https://youtu.be/R-4Q8mhpFLU and https://youtu.be/B2vqmVVZHYE and https://youtu.be/I6MYntKCdik
Engine - https://youtu.be/PAM4Yh0T7ic
Airplane - https://freesound.org/people/awr1001/sounds/468229/
Airplane costume - https://i.imgur.com/4EXQgCi.jpg
Menu images - https://unsplash.com/photos/8iZG31eXkks and https://unsplash.com/photos/9BJRGlqoIUk
Thunder - https://freesound.org/people/straget/sounds/527664 , https://freesound.org/people/juskiddink/sounds/101948 , and https://freesound.org/people/blimp66/sounds/332543
Fire - https://freesound.org/people/Aegersum/sounds/387924
▝▔▔▔▔▔▔▔▔▔▔▔▔▔▔▔▔▔▔▔▔▔▔▔▔▔▔▔▔▔▔▔▔▔▔▔▔▔▔▔▔▔▔▔▔▔▔▔▔▔▔▔▔▔▔▘
Jump to top
End of reserved posts, you may reply below.
Jump to top
End of reserved posts, you may reply below.
Last edited by awesome-llama (Sept. 20, 2020 08:30:09)
- iOvichNow
-
 Scratcher

3 posts
✈️ Flight Simulator 737-800 [DOCUMENTATION]
I have liked all your flight sims for some time and I am quite excited for your new flight sim. 

- 0000250902
-
 Scratcher

3 posts
✈️ Flight Simulator 737-800 [DOCUMENTATION]
Im very excited too! I've always been a big fan!
- 98129182
-
 Scratcher

6 posts
✈️ Flight Simulator 737-800 [DOCUMENTATION]
If you guys want to play the simulator, here's the link! https://turbowarp.org/#341589959
- 98129182
-
Scratcher
6 posts
✈️ Flight Simulator 737-800 [DOCUMENTATION]
WOAH! I played it, the stalling physics are great! The warnings are great too!
- LongGone101
-
 Scratcher

9 posts
✈️ Flight Simulator 737-800 [DOCUMENTATION]
WOAH! I played it, the stalling physics are great! The warnings are great too!How long does it take to load
- awesome-llama
-
Scratcher
1000+ posts
✈️ Flight Simulator 737-800 [DOCUMENTATION]
It is in development. It is not released even though I have provided links. I cannot guarantee that the project will be working whenever you want until it is actually released.WOAH! I played it, the stalling physics are great! The warnings are great too!How long does it take to load
- LongGone101
-
Scratcher
9 posts
✈️ Flight Simulator 737-800 [DOCUMENTATION]
I see, i will wait patiently then. Look forward to playing itIt is in development. It is not released even though I have provided links. I cannot guarantee that the project will be working whenever you want until it is actually released.WOAH! I played it, the stalling physics are great! The warnings are great too!How long does it take to load
- 0000250902
-
Scratcher
3 posts
✈️ Flight Simulator 737-800 [DOCUMENTATION]
But it didn't work
WOAH! I played it, the stalling physics are great! The warnings are great too!for mr
- 0000250902
-
Scratcher
3 posts
✈️ Flight Simulator 737-800 [DOCUMENTATION]
It didn't work for me, when I clicked start all that happened was it went to the thumbnail and stayed like that
- 98129182
-
Scratcher
6 posts
✈️ Flight Simulator 737-800 [DOCUMENTATION]
EDIT: seems like awesome has changed the scripts and stopped us from playing 

- iloveplanes380
-
 Scratcher

91 posts
✈️ Flight Simulator 737-800 [DOCUMENTATION]
my speed is not increasing very much…
- awesome-llama
-
Scratcher
1000+ posts
✈️ Flight Simulator 737-800 [DOCUMENTATION]
my speed is not increasing very much…When first accelerating? That's because of the engines still spooling up to their target speed. See the INS (instruments) page on the interface to see the engine speeds. (or press the 7 key)
- Discussion Forums
- » Show and Tell
-
» ✈️ Flight Simulator 737-800 [DOCUMENTATION]